How to use SFMC CloudPage to trigger a Journey API Entry event (SSJS | AMPscript)
I'm delighted to commence a series of Salesforce technical 'How to' posts, starting with edition #1. The insights shared in those posts stem from the requests and learnings gathered from our valued clientele. Our journey begins with a specific ask: the creation of a landing page within Salesforce Marketing Cloud ('CloudPage'). This page serves as the guardian of opt-ins for our client.
In the following posts, we'll delve into various facets of this integration. However, in this edition, our focus is on the seamless transmission of 'Opt-in' from the landing page directly into Journey Builder. This is achieved through triggering APIs from the 'Success' Cloud Page.
Let's get started!
Before we delve into the intricacies of triggering a Journey API Entry event, it's essential to understand the landscape of Salesforce Marketing Cloud (SFMC). SFMC offers both real-time and non-real-time trigger capabilities, catering to diverse client needs and preferences. In our scenario, and perhaps in many others, the expectation post-opt-in is prompt communication. It has become standard practice to receive communication immediately after opting in. Thus, our recommendation is to harness the power of SSJS and AMPscript within our Cloud Page build.
Preparations
First and foremost, crafting a DE, orchestrating a journey, and integrating an API app are indispensable prerequisites. Additionally, we need to ensure the creation of an email template and a Cloud Page to facilitate seamless communication and interaction with our audience.
Data Extension
We initiate our process by establishing a Data Extension where we define crucial fields such as SubscriberKey 'GUID', Email Address, First Name, Last Name, and any other fields essential for personalization in both email communications and API interactions. The required fields may vary depending on the campaign and specific personalization requirements. In this particular scenario, the following fields needed population: @GUID, @email, @firstName, and @lastName. The example below demonstrates how the Data Extension should appear post-API call. From a preparation standpoint, creating a Data Extension with the necessary field names/titles is adequate.
Email Studio
An email template is crucial for inclusion in the Journey Builder flow, from which it will be triggered by the API Event. But first, it needs to be created! This can be achieved from the Email Studio section in SFMC. Here are the high-level steps on how to create a template. Keep in mind that the fields needed, which were included in the API payload, can be utilized in the email template and retrieved via AMPscript.
Here are the available options:
Template Based: Opt for this choice if you already possess a template tailored for the intended email.
HTML Paste: Select this option to directly input or paste HTML code into the email editor.


Here's how you can retrieve data from the API call into the email template for personalization using AMPscript:
Journey Builder
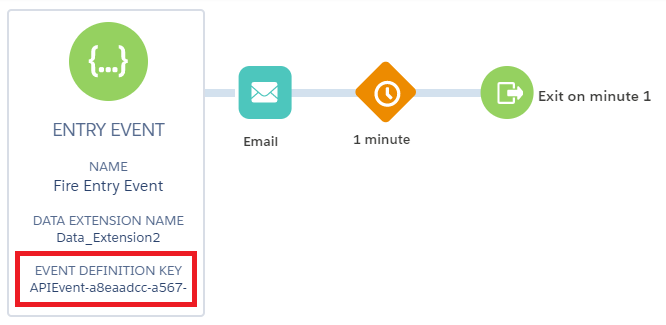
To begin, create a new journey from scratch and select the API Event function as the entry source. Once you've chosen the corresponding Data Extension, take note of the generated "Key Definition" as it holds substantial importance. Event definitions are pivotal in establishing both the title and data structure of an event. When established, the API automatically assigns a unique key to each event definition, which is subsequently used to route events to their designated journeys.

SFMC CloudPage
The Cloud Page serves as the customer-facing interface, enabling them to opt-in. Additionally, it's where the API is triggered to send data to Journey Builder for eventual email delivery. We've set up two Cloud Pages for this purpose. The first page collects all consent and data, while the API call typically occurs on the second page, known as the "success page," after the data has been submitted on the first page.

Variables are appended to the redirect link using AMPscript redirect function on the first landing page, as shown below:
Once the 'success' page is loaded after redirection, it's essential to include 'GetQueryStringParameter' in the Server-Side JavaScript (SSJS) to extract the values from the URL:
Triggering API Event
Following the process outlined in the preceding step to bring data into the 'Success' page using AMPscript, the next step involves incorporating the essential details to initiate an HTTP request for token generation. Once the token is obtained, it can be utilized to execute a secondary HTTP request to the API Integration, accompanied by the customer data we have collected to be sent to the intended Journey.
The following parameters (authEndpoint, clientId, and clientSecret) can be found within the API Integration component in Marketing Cloud setup. The eventDefinitionKey, however, can be found in the API Event section of the newly built Journey.
Summary
This blog post initiates a series of technical guides aimed at Salesforce Marketing Cloud users, addressing client requests and insights. Focused on leveraging SFMC CloudPages to trigger Journey API Entry events, the post outlines the process using SSJS and AMPscript. Starting with the creation of a CloudPage within Salesforce Marketing Cloud for managing opt-ins, it seamlessly transmits data into Journey Builder via API triggers from the 'Success' Cloud Page. Essential preparatory steps, including Data Extension setup, email template creation, and journey configuration, are detailed. The CloudPage serves as a customer-facing interface, with data transmission triggered through AMPscript redirect function. The summary concludes by outlining the process of triggering the API event, including retrieving necessary parameters and making HTTP requests for token generation and data transmission to the intended journey.
Image credit: salesforce.com